Tuesday, December 3, 2013

Day Two of Project Turkey Leftover Removal : Turkey Noodle Soup

Now let me say, I have yet to eat the first turkey and cranberry with mayo sandwich I dream of all year long. Perhaps it is because I am sick. I have thought longingly of the stuffing with cranberry a few times does that count? What day is it? ( see I am sick above) Has it really almost been a week since Thanksgiving? Maybe I should forget that stuffing I made and "donate it to the dogs.....the meat I am too cheap to do that with but at some point ( probably after tomorrow night to be honest) the dogs will be having Thanksgiving doggy style!

Anyway, tonight I made some turkey noodle soup because I am sick ( see above) and it is full of chicken broth and people swear that helps your sinuses when you have a cold,etc. Plus this is how my grandmother got rid of leftover turkey growing up and hey, when you are sick you miss your momma. Or in my case your grandmomma. And it is even easier than turkey pot pie. Yep you read that right. Even easier.

You know how I do this....pic then detailed explanation. See you at the bottom of the page or on my FB page Tips for Everyday Living whichever comes first. Hoping I feel better by in the morning. Sick of being sick----Tips


Started off with four boxes of chix broth from the dollar store ( used three) and 2 cans carrots ( one would have been enough) and 3 bags of egg noodles ( used one) and some italian seasoning.....


added some mrs dash ( one packet) some onion soup mix ( one packet) and some celery from a celery and onion mix and some long white onions from a stirfry mix ( both in freezer section).......


It was tasty.....started by adding 3 things of chix broth undiluted but you could dilute with some water if wanted to ( i got my broth from the dollar store so it wasn't as precious as if it was $4 like usual)......added 2 cans of carrots to the broth then added some onions, celery and soup mix packet and mrs dash packet and a generous portion of leftover turkey to the mixture. Let it simmer over med for about 30 min then put it down on low for another 20 or so til supper. Easy Peasy!!!Enjoy!---Tips


Monday, December 2, 2013

Day One of Project Turkey Leftover Removal : Turkey Pot Pie

I made two delicious turkeys this year in the crockpot. See my FB page Tips for Everyday Living if you are interested in how to do that....I have had a hard time getting into my blog due to a password glitch so I should have posted that on here as well but quite frankly I have been neglecting the blog lately.Hopefully it will get cranking up again and become more current. My apologies. I try to keep it running and share all my posts on my FB page Tips for Everyday Living where I post multiple times a day.

As I stated on my FB page Turkey pot pie is super easy and if you have never tried it you will be amazed at all those times you thought so and so was a terrific cook and they really just knew a secret you didn't know....Turkey Pot Pie is a cinch with a storebought pie crust.

I will start posting pics and give descriptions as I go. Enjoy!!--Tips

 
I started by defrosting or letting get to room temp TWO ( only one shown) store pot pie crust....they come two in a pack....once they sag they are good....before that they will fight you when you unroll them....believe me, it is worth the wait....give it 20 or 30 min to sag.....along with that get out a can of potatoes, a can of corn and a can of peas or whatever veggies you want to add to your pot pie....this is a great way to get rid of leftovers and get some veggies in your family during flu season!

 
this is what a sagging crust should look like....it will be soft and pliable to the touch

 
this is the other crust I rolled out into a pie plate....that is diced up turkey inside the pie plate....I usually mix everything is a bowl but I didn't tonight....I mixed it gently in the pie plate....that was a  mistake....bowl I repeat bowl.....

 
add a big can of cream of something soup....I like cream of chicken or celery or mushroom all are fine

 
this is a bag of frozen carrots I dipped into as part of my ingredients I added

 
this is my rendition of an old lady in curlers....the efforts I go to for you people!!


drained the canned corn and peas( u can use fresh or organic or whatever floats your boat....just veggies is all that is important)
 
Lastly I added some hunks of potatoes....again, this really is enough for two pot pies and I do not recommend mixing it in the pie plate....won't be doing THAT again.

 
patted it all down flat and mounded it up into a nice little hill then rolled out the other pie crust on top....just peel the edge off and press it down on the existing pie crust and start unrolling....it is not hard I promise.....roll to the other side....if it overlaps just flip it up and make it part of the crust
 
 
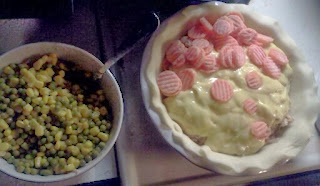
you need to vent your pot pie so I made an M for my daughter's name. Wha-lah. Turkey Pot Pie. How hard was that? It wasn't was it? See I knew you could do it!! I am proud of you!!--Tips
 

Friday, October 4, 2013

Have you seen all the new flashlight types? Some of these are pretty amazing!

Was in Walmart the other day and took a minute to look at the various flashlights....I ended up buying one of those big fat ones with a handle that take the square battery....it works great. Highly recommend it. Had tried various mag lights and other flashlights whenever I was walking my dogs at night and I have to tell you....that lantern style was stronger than the mag light! And only $3 with the battery so win win for this cheapskate!

Ok well other than taking it on a camping trip or lately I have been shining mine in the bushes,etc while walking the dogs and taking one in the car at night to make sure I don't twist my ankle in a parking lot.....flashlights are one of those things you take for granted til you need it....then it goes up a notch in your opinion. I guarantee you can find one you will find useful at some point from the list below....these all were seen in Walmart....probably even more types out there! Enjoy!--Tips

These are headlight type "flashlights" you put on a cap....I guess could come in handy hiking in the woods....could see branches ahead of you or other things at eye level and obviously whenever you turned your head it would illuminate the things you were looking at....could definitely come in handy


if you look at the little illustration to the right hand side....this flashlight has various angles it can be adjusted to


this is the type of lantern I bought which I love....mine is not a floating lantern like this one but if you have a boat that would be a plus....says lasts 10 times longer....I have no idea the validity of that statement


this is a spot/flood light....could come in handy when working on cars or what have you


this says 360 degree area lamp so hang it in a tree at your campsite or event and enjoy the area


this is pretty cool...i think it has a radio if I remember correctly....says weatheready


these are two more cap lights....but LED this time....for trails it says


this is a solar powered light which hey...you don't always have money for batteries!


if it wasn't for the price tag I would have bought this.....i think they wanted $40 but it has a radio and a light and i think it charges your cellphone too....very nice for hurricanes,etc


this is a nice bright light with an adjustable head....says LED folding lantern.....


this is nice LED lamp that hangs....good for hanging over any table or work area or car you want illuminated


this is a nice lantern style flashlight but you can use the battery area for storage....be nice for the boat to keep things dry


this says ultra bright spotlight....looks like could come in handy especially if in areas with cliffs or other steep dropoffs.....

Well hopefully you found one or more you could use in this list....pretty amazing eh?--Tips

Tuesday, October 1, 2013

Get yourself a quesadilla maker at Goodwill and make them at home!

I bought a quesadilla maker at Goodwill for next to nothing....I think it was all of $5.....they are around 20 or 25 in the stores....Quesadillas are an easy dinner to make and they are great for nights when you either don't feel like cookin' due to a busy day or you don't know what to cook and you have a bag of cheese in the fridge that needs to be used up....well that never happens but you see where I am going with this don't cha? They are easy for the lazy chef and that wins hands down everytime in my book! ( for the record my dollar store has the tortilla shells)

So get yourself a quesadilla maker or plan to fry them or however you want to do it is fine by me. I will be making mine in my handy dandy quesadilla maker from Goodwill.:)

So I usually serve my Mexican meal with corn and refried beans. Sometimes I cook yellow rice as well. If you have not tried it, do so. Yummy and a great filler if you are running low on meat. Which I was last night so I decided I would make cheese and bean quesadillas....Now if you really want to make them delicious sauté some real onion in some olive oil first and then add it and some cheese and black beans to your tortilla shell but I was also running low on motivation and energy last night. So I planned to make rather unimpressive cheese quesadillas but as luck would have it they turned out delicious and shocked me so I am sharing them with you!!

I started by adding cans of refried beans and corn to the pots on the stove. To my corn I add a little sugar and a pat of butter and to the refried beans I added a dash of cumin ( little goes a long way....do not be heavy handed), generous globs of salsa and some onion powder and some minced onion flakes since I was not in the mood to cook some real onion ( see above). I headed both of these on low heat in the back of the stovetop while the quesadillas cooked.

I then put the tortilla shells on two plates side by side with equal number of shells...so in my case there were 4 of us so 8 shells....4 per plate. You could make them by using one shell per person but my date on the shells is only for a few more weeks and I didn't have rice,etc for additional meal making possibilities.....wanted everyone to get enough in other words. :)

So I went in search of black beans then remembered I had put them back in line due to a big dent in the can....so no black beans to bulk them up. No energy to fix onion to bulk them up. No yellow rice. Hmm......how about blackeyed peas? They are mushy like refried beans....might be able to make them think they are black beans.....worth a shot right?

Started by draining the blackeyed peas in the sink ( I use luck's....it has a wonderful sauce on the beans) and then added about half the can to the refried beans on the stove ( yes you read that right....I am not one for wasting food) and then added the rest to the two quesadillas that my husband and I wanted....the kids will barely eat the cheese ones....hence the rice and corn usually. You can also serve tortilla chips on the side which I normally do and they have chips and cheese and corn. Hamburger if I am up to cooking it but see above....it was a bare bones dinner kinda night :)

So I made two cheese quesadillas and then put them on the plate that did not have any shells on it.....I preassemble my shells and toppings and then end up with several on top of each other waiting for the cooker and then an empty plate....so I sprayed the quesadilla maker with cooking spray ( I am not a fan but in this case easier) and cooked the two cheese ones first ( they were on the top of the stack) ....and then moved on to the cheese and blackeyed pea ones....my only complaint is if you leave them on there too long some of the cheese and the beans fall out ( I leave an edge on the cheese and shell for this reason....stop your cheese about an inch or half inch before edge of tortilla shell)....I then transferred them to plates and used a pizza cutter to cut them and added refried beans, corn, salsa and sour cream to each plate!

Well I am happy to report the quesadillas with blackeyed peas were delicious and the refried beans had a nice lumpy texture to them! Be making these again! Go get you a quesadilla maker and they will be calling you the hit of the block! You could use it at parties or Cinco De Mayo,etc....Enjoy!--Tips


Monday, September 30, 2013

If you like my blog check out my FB page Tips for Everyday Living! Thanks. --Tips

Making a gravel pathway with stepping stones was easier and faster than I thought it would be! Try it yourself!

I have been slowly (as the budget allows) making gravel pathways in the backyard....we just moved into this house about a year ago so I am slowly getting things how I want them.....I have two pathways and a firepit area which I am going to slowly fill with gravel between now and when it gets cold so I can have a nice place to chill on the winter evenings....previously i made a gravel area and used trash bags from the dollar store( see link other gravel area i did using trash bags)....since this was a long pathway I decided to use a plastic dropcloth which was cheaper/easier.....my stepson and I were finished in a little over an hour!! What I thought would be an arduous job was in actuality very easy!! I am relatively pleased with the results....unfortunately someone had taken most of the pegs that hold the edging in place out of the bag so I didn't have the full amount of pegs to hold the edging so it is a bit off here and there but I am not one for precision anyway so it fits me to a T....no need to kid you or myself....I wing it most of the time anyway so why should this be any different? I could have driven back to the store but I wanted to get it done after putting it off for several days.

I already had a walkway with stepping stones in place so that made it relatively easy to do. Just submerge some stepping stones if you do not have an existing path of stepping stones or just lay them flat on the ground if you want. Lay out some black edging and tamp it into place using the stakes that come with it. I was not that happy with the edging until we did the gravel then I was happy. However I probably should have bought the metal type you knock into the ground but I thought it would be a pain with roots,etc....this just laid on top of the existing ground and was held in place by little stakes ( but again I was working with less stakes than I should have been so there is a slight curve to it but that can be fixed later if I want to do so). I also am not finished b/c it merges with two other paths so that makes mine a bit complicated on each end which hopefully yours will not be. I am not finished in those ends yet so understand that this is not 100% complete.

Here is the process end to end.....so easy try it yourself sometime....it was relatively inexpensive as well...I got the edging at Lowes for $10 i think it was and the bags of gravel ( i used four in this section) was $3 plus for each bag so roughly $14 for some gravel and $1 plus change for a plastic drop cloth....so all in all, under $30 to have a nice walkway ( well plus the cost of stepping stones but they are under $2 per stone) so for $40 to be fair you could have a nice walkway for your home or office!--Tips


this is what I started with....the stepping stones seen to the left curve to the left in an arch and so I stopped my edging up higher so the two paths would combine at the intersection....in the grass you see the cut outs in brown where the stepping stones were but we moved them outside the area we would be laying plastic. we also had held the plastic edging in place with stakes already.


this was a dropcloth I used in lieu of the plastic trashbags which worked but were problematic at the intersections btw bags....this made it an easy thing to deal with the plastic and it was cheaper than the bags!


just seeing how long the drop cloth would go...notice the edging on the left stops before the plastic does


we spread it out but kept it folded in half so no weeds grow through it....that is what the plastic is for....to prevent weeds growing through the gravel.....


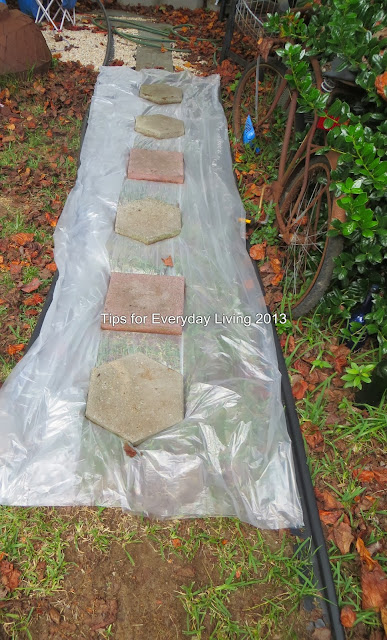
we then laid the stepping stones back where there were initially placed ( if you do not have an existing path just lay them directly on the ground but you will have to bring your gravel level up higher or be ok with a slight drop between the gravel and stepping stones)


here is an image of all the stepping stones back in place on top of the plastic....again....my walkway combines with another one besides it that goes to the left in an arch so yours won't be as complicated....)


we then laid the bags of gravel on top of the stones and cut them open....you don't want them too close to edge b/c if you lose rocks you are losing money


i emptied mine on top of the stepping stones then wiped them off of them and toward the edging....make sure no rocks go under the plastic but instead lay on top of the plastic and hold it down....cover all areas of plastic


we ended up with some plastic sticking up which is not a big deal....you can either trim it with scissors.....


or we just pushed it down and covered it with rocks....


this is what we ended up with after very little effort.....I am very pleased with the result....so easy and took very little time....under 2 hrs....I think it took about 1.5 hrs if that! Again there is a slight curve to the path on the left edge but I was without enough stakes and if it bothers me I can push it in and hold it in place using a stake from the next set of edging I buy. Again, the ends are not completed yet but overall I am very pleased! Try it sometime and beautify your home or office!! So simple and makes a nice pathway!--Tips